|
NCI - Hair/Hat Mesh Shading Problem
|
|
|
#1
25-06-2014
Hi everyone,
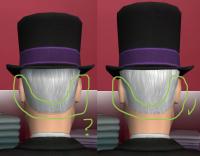
I'm currently working on a shorter top hat from the one already in the base game for Sims 2. I successfully modified the mesh from the base game hat, and it shows in the game. However, there's a problem with the shadows (?) connecting the hair with the head/neck. The skins are not mixing well. Here's the picture:

I was wondering if someone can provide instructions or guidance on how to fix this issue. On the left is the new mesh, on the right is the recolor of the base game hat.
I'm currently working on a shorter top hat from the one already in the base game for Sims 2. I successfully modified the mesh from the base game hat, and it shows in the game. However, there's a problem with the shadows (?) connecting the hair with the head/neck. The skins are not mixing well. Here's the picture:
I was wondering if someone can provide instructions or guidance on how to fix this issue. On the left is the new mesh, on the right is the recolor of the base game hat.
d_dgjdhh, proud to be a member of LeeFish since Apr 2013.
(This post was last modified: 25-06-2014 06:21 AM by d_dgjdhh.)
#2
25-06-2014
Hmmm. Looks like it could be a "normals" issue. How exactly did you alter the mesh? Did you scale the entire thing, and then reattach the bottom of the hair to the neck in that spot? It looks like the original hair is a bit longer than yours... I'm guessing it may have the exact same issue and you just can't see it because it's under the hair.
Anyway, I would try to fix the "normals". Get an adult face GMDC imported into your MilkShape project as the top group, above the hair/hat. Then select the verts along the problem seam - one at a time (not the whole seam at once) - and use the "normal data merge" option under the Vertex menu to copy the "normal" data from the neck to the hair so they match up correctly. Don't forget to delete the face GMDC group before exporting your project.
I'm assuming you have experience with MilkShape and know where to find the things I mentioned above, but if not just ask.
ETA: Also - before doing anything, do double check that it's the hair and not the skin causing your problem. If that's a custom skin on your sim, test it with a Maxis skin just to make sure it's not the custom skin's fault - nothing like figuring that out after hours of fiddling and tearing your own hair out.
Anyway, I would try to fix the "normals". Get an adult face GMDC imported into your MilkShape project as the top group, above the hair/hat. Then select the verts along the problem seam - one at a time (not the whole seam at once) - and use the "normal data merge" option under the Vertex menu to copy the "normal" data from the neck to the hair so they match up correctly. Don't forget to delete the face GMDC group before exporting your project.
I'm assuming you have experience with MilkShape and know where to find the things I mentioned above, but if not just ask.

ETA: Also - before doing anything, do double check that it's the hair and not the skin causing your problem. If that's a custom skin on your sim, test it with a Maxis skin just to make sure it's not the custom skin's fault - nothing like figuring that out after hours of fiddling and tearing your own hair out.

#3
25-06-2014
So here's what I did:
01. Start Body Shop
02. Create new project in Body Shop for top hat hair (brown)
03. Import project into game (the new file being in Saved Sims folder).
04. Close Body Shop
05. Load up SimPE
06. Create new file
07. Tools -> PJSE - Body Mesh Tool -> Extracting Stage
08. Clicked Browse, look for the new file from #3.
09. Clicked yes to import all resources needed.
10. Saved MESH file.
11. Extracted the adult male (& teen male) top hat GMDC files into a work folder.
12. Closed SimPE
13. Open Milkshape3D.
14. File -> Import... -> Sims2 Unimesh v4.0.9 Importer
15. Chose adult top hat GMDC file.
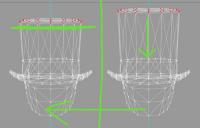
16. Chose the vertices from above and moved it down the Y-axis -0.03, like so:

17. File -> Export... -> Sims 2 Unimesh v4.0.9 Exporter
18. Saved new GMDC file.
19. Closed Milkeshape.
20. Opened SimPE again
21. Opened MESH file from #10
22. Replaced original GDMC to the new GDMC from #18.
23. Renamed new filename from Generic Rcol Editor to the original filename.
24. Commit, then save.
...And adjusted the resource nodes and shape nodes in the new file from #3 to use this new mesh.
I'll try to figure out how to fix the "normals". It shouldn't have been very complicated, since it was just a shortening of the top of the hat (no touch ups for the neck area).
Oh yeah, and no, I'm not using custom skin.
01. Start Body Shop
02. Create new project in Body Shop for top hat hair (brown)
03. Import project into game (the new file being in Saved Sims folder).
04. Close Body Shop
05. Load up SimPE
06. Create new file
07. Tools -> PJSE - Body Mesh Tool -> Extracting Stage
08. Clicked Browse, look for the new file from #3.
09. Clicked yes to import all resources needed.
10. Saved MESH file.
11. Extracted the adult male (& teen male) top hat GMDC files into a work folder.
12. Closed SimPE
13. Open Milkshape3D.
14. File -> Import... -> Sims2 Unimesh v4.0.9 Importer
15. Chose adult top hat GMDC file.
16. Chose the vertices from above and moved it down the Y-axis -0.03, like so:
17. File -> Export... -> Sims 2 Unimesh v4.0.9 Exporter
18. Saved new GMDC file.
19. Closed Milkeshape.
20. Opened SimPE again
21. Opened MESH file from #10
22. Replaced original GDMC to the new GDMC from #18.
23. Renamed new filename from Generic Rcol Editor to the original filename.
24. Commit, then save.
...And adjusted the resource nodes and shape nodes in the new file from #3 to use this new mesh.
I'll try to figure out how to fix the "normals". It shouldn't have been very complicated, since it was just a shortening of the top of the hat (no touch ups for the neck area).
Oh yeah, and no, I'm not using custom skin.
(This post was last modified: 25-06-2014 04:55 AM by d_dgjdhh.)
#4
25-06-2014
Ok, so it's been figured out, Here's the solution:
When starting at step 13:
13. Open Milkshape3D.
NOTE:
13B: On the right side, click on the tab "Groups"
13C: in the middle area, below the "Clear All" button, UNTICK "Auto Smooth" checkbox. Make sure it's blank.
THEN:
14. File -> Import... -> Sims2 Unimesh v4.0.9 Importer
.
.
.
...and so on.
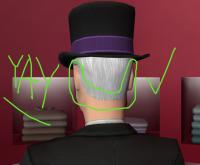
Here's the result now!

Success! And special thanks to Fanseelamb for finding the solution to this issue. What would be an appropriate title for the thread for future hair meshers to search for?
When starting at step 13:
13. Open Milkshape3D.
NOTE:
13B: On the right side, click on the tab "Groups"
13C: in the middle area, below the "Clear All" button, UNTICK "Auto Smooth" checkbox. Make sure it's blank.
THEN:
14. File -> Import... -> Sims2 Unimesh v4.0.9 Importer
.
.
.
...and so on.
Here's the result now!
Success! And special thanks to Fanseelamb for finding the solution to this issue. What would be an appropriate title for the thread for future hair meshers to search for?
(This post was last modified: 25-06-2014 06:24 AM by d_dgjdhh.)
#5
25-06-2014
Awesome! So glad we managed to figure it out in chat. Hope you'll pop back in again sometime. 
Hmmm a thread title. Maybe "Hair/Hat Mesh Shading Problem"? Something like that?

Hmmm a thread title. Maybe "Hair/Hat Mesh Shading Problem"? Something like that?
|
|